Our Use Case
An effective continuous integration system is a crucial component for fast-paced software development. At Hiya, we built our CI system using Jenkins deployed on Kubernetes via a fork of the official Helm chart. This decision was largely inspired by Lachlan Evenson’s tutorial video Zero to Kubernetes CI/CD in 5 minutes with Jenkins and Helm.
Traditionally, running Jenkins on Kubernetes involves dynamically creating Jenkins agents for each job. There are many benefits with this approach, but in our experience it has one critical downside: Short-lived Jenkins agents do not retain the dependencies they pull in. Each of our jobs spent 20 minutes pulling dependencies. All 20 minute delays added up to an enormous loss in productivity.
We were unable to find any community solutions to this problem, so we created an approach to deploy stateful Jenkins agents on Kubernetes. Running stateful agents allows us to persist our cache of dependencies between jobs/pods, dramatically speeding up build times. This article will explain our approach and provide a demo that can be run in the reader’s Kubernetes cluster.
Please note that all resources mentioned in this article can be found in this git repository: https://github.com/hiyainc/jenkins-stateful-agents-demo.
Alternatives Considered
Before we get into our stateful agent solution, we will cover some other approaches we tried and the downfalls we encountered with each. We build the majority of our services with Scala, so some of our approaches are JVM specific. The “stateful agent” solution, however, is technology-agnostic.
First, we tried caching our dependency artifacts on a persistent Artifactory OSS instance running within our cluster. This made no significant impact to our build times, indicating that the bottleneck was in dependency resolution, not the network.
Our second approach built agent docker images with all our dependencies statically cached. This helped initially, but degraded as projects updated their dependencies. We could regularly build new images with updated dependencies, but this is tedious and costs developer time.
The third iteration mounted a persistent volume onto each dynamically created Jenkins agent. This works, but since most persistent volume types can only be mounted onto one pod at a time, we cannot run multiple agents at the same time.
We considered modifying our third approach with a ReadWriteMany persistent volume, allowing multiple agents to run in parallel while sharing a cache. In some cases this may work, but the general approach introduces potential for race conditions. We would rather not worry about this complexity.
After all these attempts, we decided to create long-lived stateful agents that each have their own persistent storage. While we could not find an existing example anywhere, we felt that this was the simplest and most reliable solution and worth figuring out.
We will need to create:
- A Jenkins master, fully configured for our needs
- A Jenkins agent with a static hostname and persistent volume, which automatically configures Jenkins master to use the agent
- A test job that demonstrates the stateful behavior of our agent.
Our Jenkins master will not be stateful. In a production environment, a Jenkins master should be stateful, but in this article we have decided to not worry about this for simplicity’s sake. There are plenty of resources online to help you set up a persistent volume for your Jenkins master if you need help.
Note: Jenkins “agents” used to be called “slaves”, and some plugins and docker images still use the old name. We will use “agent” unless referring to one of these plugins or images.
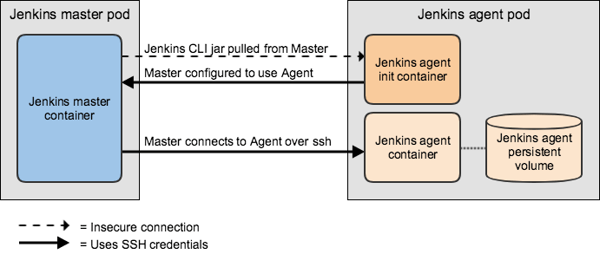
Communication between master and agent
There are a number of ways a Jenkins master and agent can connect to each other. We will initiate this connection from the Jenkins master over SSH, using SSH credentials to secure the connection. This approach requires that we install the ssh-slaves plugin to our master, mount ssh credentials into the master and agent, and base our agent off of an ssh-slave image.
Additionally, the Jenkins master needs to connect to each agent via unique static hostnames, which we get by deploying our agents using a StatefulSet.
Initialization of agent(s)
Jenkins master will not connect to an ssh-based agent unless it is configured to do so. We can bootstrap this configuration by giving each agent pod an Init Container in charge of configuring Jenkins master. By the time the agent starts up, Jenkins master will already be trying to connect.
The Init Container will need to complete the following:
- Download the Jenkins CLI from master
- Use the CLI to check if master is already configured to use this agent
- If needed, use the CLI to configure master to use this agent
This will require some configuration within our agent pod:
- fsGroup set to the “jenkins” user group. This is needed because persistent volumes mount as the root user by default, making them unusable for the “jenkins” user.
- Environment variables within the Init Container:
- JENKINS_URL: http address of Jenkins master
- JENKINS_LABEL: label for our agent
- Environment variables within the main container:
- JENKINS_SLAVE_SSH_PUBKEY: public key to authenticate connection attempts
Initialization of master
Our Jenkins master will need to start up with some configuration pre-applied. Specifically, we will need to:
- Install the ssh-slaves plugin
- Enable SSHD
- Set “admin” user’s public key (so the Init Container can authenticate as “admin”)
- Add an SSH key credential (to connect the agent)
While we will not go into detail about how this is all configured, all the necessary configuration is in the values.yaml file in this demo’s resources on Github.
How to
Note: All steps assume that we are deploying into the default kubectl context. You may need to set your default context, or modify the commands to manually provide a context.
Jenkins master
- Clone our repository containing this demo’s Kubernetes resources, then apply our Kubernetes secret containing our ssh credentials.
➜  git clone https://github.com/hiyainc/jenkins-stateful-agents-demo \
   && cd jenkins-stateful-agents-demo \
&& kubectl --namespace jenkins-demo apply -f jenkins-ssh-secret.yaml - Use Helm with the provided values.yaml file to configure and create a Jenkins master. All settings in values.yaml are explained in the previous section.
➜ helm install --name jenkins-demo --namespace jenkins-demo stable/jenkins -f values.yaml
- Verify that Jenkins master is properly configured. Specifically:
- The ‘admin’ user should be configured with our public ssh key.
- There should be a single ssh credential, referencing files on disk.
- The sshd port should be enabled and set to 22.
- The ‘ssh-slaves’ plugin should be installed.
To do this, log into Jenkins master via the web console, and check following paths:
- /user/admin/configure
- /credentials/store/system/domain/_/credential/jenkins-agent-ssh-key/update
- /configureSecurity/
- /pluginManager/installed
Note: The following commands use the shell tool ‘jq’.
To get the url to use in your browser:
➜  echo http://$(kubectl get nodes -o json | jq -r '.items[0].status.addresses[0].address'):$(kubectl --namespace jenkins-demo get svc jenkins-demo-jenkins -o json | jq -r '.spec.ports[0].nodePort')
http://10.0.10.15:31639
To get the password for the admin user:
➜  kubectl --namespace jenkins-demo get secret jenkins-demo-jenkins -o json | jq -r '.data["jenkins-admin-password"]' | base64 -d
yn5nUy0jLz - The service provided by the Helm chart does not include the sshd port. To resolve this, we must add an additional service. More on this under “best practices”.
➜ kubectl --namespace jenkins-demo apply -f jenkins-master-svc.yaml
Jenkins agent
- Deploy the ConfigMap with our initialization script. This will be mounted into our Init Container to configure master to use this agent.
➜ kubectl --namespace jenkins-demo apply -f jenkins-agent-bootstrap-configmap.yaml
- Deploy the StatefulSet. This will create our agent(s), each of which will have a unique persistent volume and static hostname. If you do not have a default storage-class in your cluster, first edit this statefulset to use a storage-class your cluster supports.
➜ kubectl --namespace jenkins-demo apply -f jenkins-agent-statefulset.yaml
- Within a few minutes, “jenkins-agent-0” should be visible as a “build executor” from the master’s web console!
Testing
From our Jenkins master’s web console, create a new Freestyle job, and configure it as follows:
- “Restrict where the project can run” should be set to the label for our stateful agents (“stateful”, in our demo).
- Give a single “Execute shell” build step, with the following script:
FILE=/mnt/pv/builds
echo "Adding build id to $FILE"
echo $BUILD_ID >> $FILE
echo "Current state of $FILE:"
cat $FILE
Save this job and run it a few times. Each run will concatenate the build number to a file, then print out the file. After 3 runs, you should see output that looks like this:
Started by user admin
Building remotely on jenkins-agent-0 (stateful) in workspace /home/jenkins/workspace/test-job
[test-job] $ /bin/sh -xe /tmp/jenkins6384725398355425391.sh
+ FILE=/mnt/pv/builds
+ echo Adding build id to /mnt/pv/builds
Adding build id to /mnt/pv/builds
+ echo 3
+ echo Current state of /mnt/pv/builds:
Current state of /mnt/pv/builds:
+ cat /mnt/pv/builds
1
2
3
Finished: SUCCESS
Final Thoughts/Best Practices
With this approach, our job durations decreased from ~20 minutes to ~3 minutes! This is a huge win for us. While the end result is not as simple as using stateless, short-lived agents, it has not been difficult to maintain. Occasionally a job does put our workspace into a buggy state, but since our persistent volumes only cache our dependencies, we can simply bounce the agent pod. Our dependency cache is preserved, and the pod starts with a fresh workspace.
If you would like to follow our example and add stateful agents to your Jenkins server, here are a couple points to bear in mind:
Be mindful of what parts of your agent actually need to be stateful, and limit your persistent volume to contain exactly those parts. In our case, our persistent volumes only contain our Ivy dependencies. Other parts of the agent, such as its workspace, are not treated as persistent. Introducing state to any application adds complexity, so minimize your state as much as possible.
Use a persistent storage backend that is reliable. Our Kubernetes clusters run on AWS, and we have dealt with a lot of pain around EBS-backed persistent volumes, particularly around the automated mounting/unmounting of the volumes onto the underlying EC2 instances. This led us to try installing the efs-provisioner, which has proven much more reliable. Our pains with EBS were fixed when we upgraded to Kubernetes 1.7, but the lesson stands that the persistent storage backend that you choose matters, so choose wisely!
Setting an external address for your Jenkins master will break this flow by changing the advertised SSHD address. If you want an external domain for Jenkins master, you need to set the “org.jenkinsci.main.modules.sshd.SSHD.hostName” system property to the preferred host.
The Jenkins Helm chart’s service does not include the sshd port. In our demo, we exposed this port via an additional service, and hardcoded our agents to access the Jenkins master via this service’s shortname. In a production system, this manual configuration is not recommended. Instead, add this port into a service dynamically. In our actual Jenkins, we do this by forking the Helm chart and adding the extra port into the Jenkins master service.